 Save
Save I discovered the magic of checkerboard platters at a summer wedding where the appetizer table was as much art as it was delicious. One of the servers told me they'd arranged these striking little squares the morning of the event, and watching guests gravitate toward them—drawn in by the visual pattern—taught me something about how we eat with our eyes first. I went home determined to master this simple technique, and now it's become my secret weapon for impressing at potlucks and picnics without spending hours in the kitchen.
My neighbor Sarah once brought a checkerboard platter to our Fourth of July gathering, and I remember how the kids at the party actually paused their games to admire it before eating. That's when I realized that a beautiful presentation isn't just about impressing adults—it makes everyone feel like they're part of something special.
Ingredients
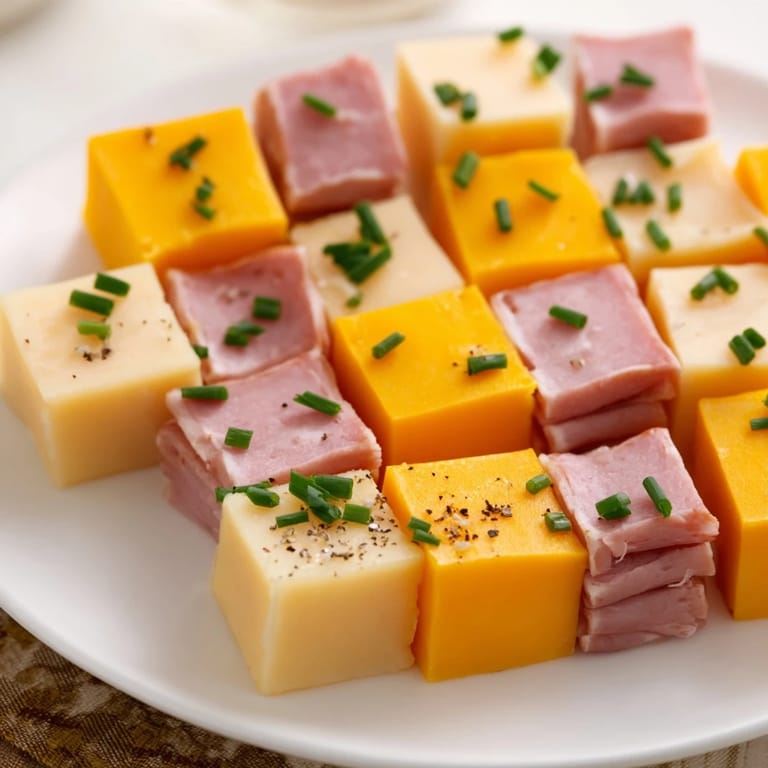
- Smoked turkey breast (8 slices, cut into 1-inch squares): The lighter square in your checkerboard that provides a delicate, smoky flavor and creates that striking visual contrast. I always buy from the deli counter rather than pre-packaged because the fresher slices hold their shape better when you're pressing them together.
- Roast beef (8 slices, cut into 1-inch squares): The deeper color gives you contrast against the Swiss cheese and adds a richer, more assertive flavor that balances the sweetness some people find in cheddar. Ask the deli to slice it medium-thick so it doesn't tear when you're cutting squares.
- Swiss cheese (8 slices, cut into 1-inch squares): This pale, mild cheese is the quiet backbone of your pattern, and its subtle nutty flavor lets the meats shine. The firm texture means it won't crumble when you're cutting and arranging.
- Sharp cheddar cheese (8 slices, cut into 1-inch squares): The sharpness gives your bites personality and stands up beautifully to the smokiness of the turkey. The bright color also strengthens your checkerboard pattern visually.
- Fresh chives, finely chopped (optional garnish): A whisper of onion flavor and a touch of green that makes the whole arrangement feel intentional and finished. I've learned that even a small handful makes people notice the care you took.
- Cracked black pepper (optional garnish): This final touch adds depth and reminds people that simple ingredients, when arranged with thought, become something memorable.
Tired of Takeout? 🥡
Get 10 meals you can make faster than delivery arrives. Seriously.
One email. No spam. Unsubscribe anytime.
Instructions
- Gather your canvas:
- Lay out your parchment paper or serving board in front of you. This is your stage, so take a moment to make sure it's clean and ready. I like to use a cutting board that's slightly larger than I think I need because it gives me room to work without feeling rushed.
- Cut your squares with intention:
- Using a sharp knife and a gentle sawing motion, cut each slice of meat and cheese into 1-inch squares. The blade should glide through without tearing or crushing—you're aiming for neat edges that look deliberate. I do all the turkey first, then the beef, then the cheeses, grouping them on my cutting board so I can see my colors all at once before arranging.
- Map your pattern:
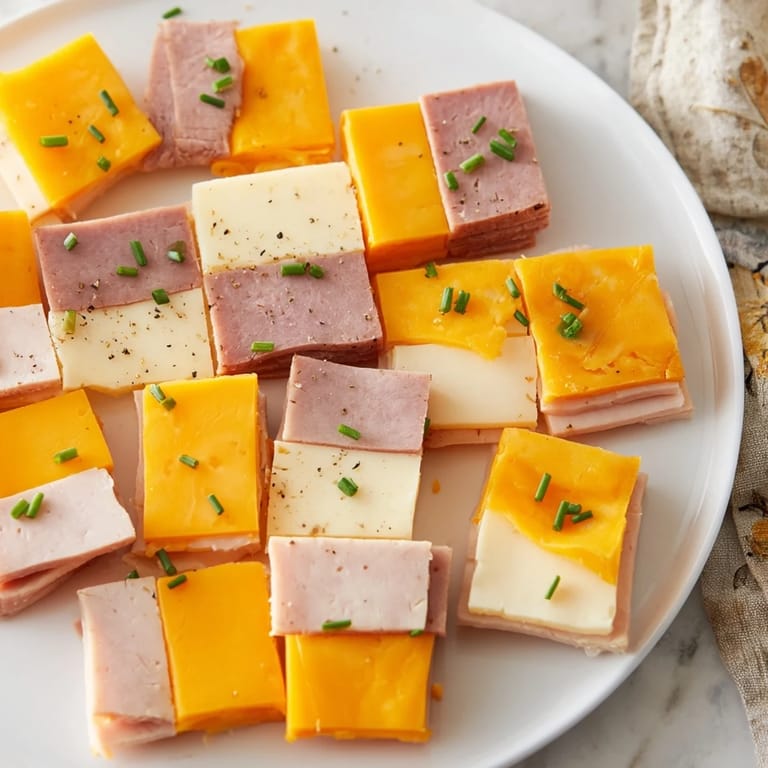
- Start in the top left corner and lay down your first square—let's say turkey. Moving right, place a cheddar square next to it. Continue alternating across the row, then move to the second row and start with a different meat, like roast beef. This creates that classic checkerboard where no two squares of the same ingredient touch diagonally or horizontally. Take your time here; this is the moment where the magic happens.
- Secure without fussing:
- Gently press adjacent squares together where they meet. The natural slight stickiness of deli meats and cheese usually keeps everything in place. If you're transporting this or assembling far in advance, add a tiny dab—barely visible—of honey or whole grain mustard under each square. This holds everything together without making the bites soggy or changing their flavor.
- Finish and serve:
- Sprinkle your chives and cracked pepper over the entire arrangement if you're using them. This adds visual texture and flavor complexity. Serve chilled or at room temperature with toothpicks nearby for easy grabbing. The moment people see this, you'll know you've created something they'll remember.
 Save
Save There was a moment at my daughter's school event when she pointed to my checkerboard platter on the refreshment table and told her friend 'my mom made that.' The pride in her voice—not about how it tasted, but about how it looked—reminded me that the visual beauty of food is its own kind of love language.
Playing with Color and Contrast
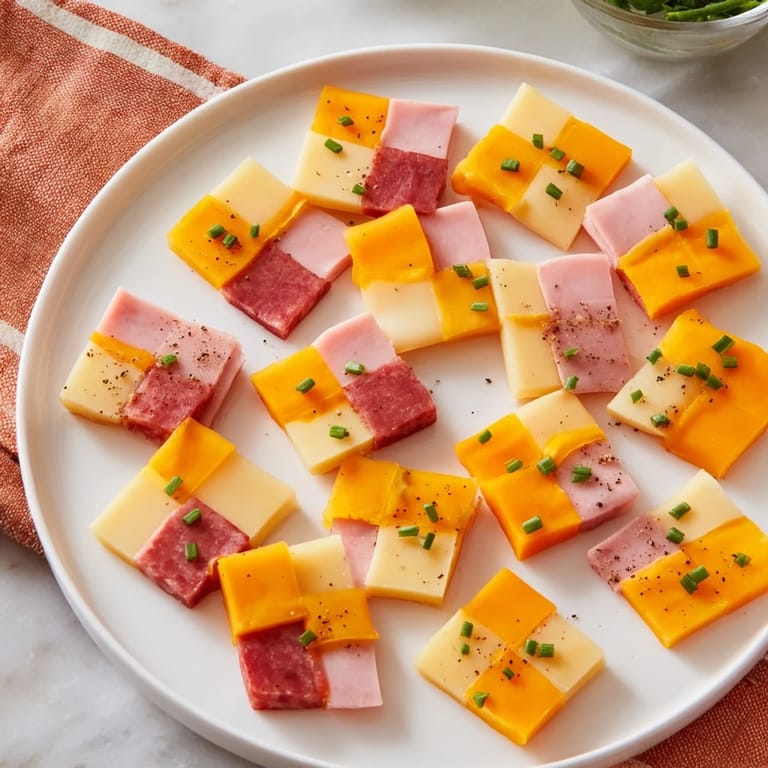
The real joy of this recipe is that it's a canvas for whatever contrasting ingredients speak to you. The checkerboard pattern works because of visual opposition—light against dark, soft against firm. If you're feeding vegetarians or want to experiment, roasted beet squares against cucumber slices create a stunning ruby-and-green pattern with surprisingly complementary flavors. I've also seen prosciutto paired with creamy fresh mozzarella, and the delicate pink against pure white is absolutely elegant. The principle remains the same: choose two ingredients that look dramatically different and taste beautiful together, and let the pattern do the talking.
Scaling and Customizing Your Grid
This recipe makes a classic 4x4 grid with 16 bites, which is perfect for a small gathering or as part of a larger spread. But you can absolutely scale it down to a 2x2 grid if you're feeding just a few people—use 2 squares each of your chosen ingredients and you've got an elegant small platter in five minutes. For larger parties, I've made multiple grids on different boards and arranged them together, which somehow looks even more striking than one massive board. The math is simple: every 4x4 grid needs 8 squares of each ingredient type, so adjust up or down from there. The beauty is that this recipe grows or shrinks without losing any of its impact.
Pairing and Presentation Secrets
This is the kind of appetizer that bridges the gap between casual picnics and elegant dinner parties, which is why thinking about what you serve alongside it matters. I've learned through trial and error that checkerboard bites dance beautifully with sparkling wine—the bubbles refresh your palate between the rich saltiness of the meats and cheeses. On warm days, a cold lemonade or iced tea plays the same role, cutting through the richness without competing. For presentation, I arrange my platter about thirty minutes before guests arrive, cover it loosely with plastic wrap (so the garnish stays put), and refrigerate. This keeps everything cold and crisp while still giving you time to finish other preparations. If you're serving this at a picnic or outdoor event and it'll be in the sun, keep it on ice or in a cooler until the last possible moment—warm cheese loses its appeal quickly.
- Toast some crusty bread or serve with water crackers alongside so guests have an option for those who want a bit more substance
- Place your platter at eye level on the table so people actually see it—a beautiful appetizer hidden at the back of a crowded buffet is a wasted opportunity
- Set out small napkins and toothpicks nearby so your guests can eat without hesitation, which means they'll eat more and enjoy it more
 Save
Save What started as an inspired moment at someone else's party became my go-to move for every gathering because it proves that the simplest recipes are often the ones that stick with people. This is food that looks like art but tastes like a warm hello.
Recipe Q&A Section
- → How do I assemble the bites for best results?
Arrange alternating squares of meats and cheeses on a flat surface in a checkerboard pattern, pressing gently to adhere. Using small dabs of honey or mustard can help hold pieces together during transport.
- → Can I substitute the meats or cheeses?
Yes, try prosciutto with mozzarella or salami with Havarti for different flavor combinations. Vegetarian options could include alternating roasted beet and cucumber slices.
- → What garnishes complement these bites?
Finely chopped fresh chives and cracked black pepper add a subtle kick and enhance visual appeal without overpowering the components.
- → Are these bites suitable for dietary restrictions?
They are naturally gluten-free, but be cautious with deli meats as some may contain hidden gluten or preservatives. Dairy from cheeses should be considered for those with allergies.
- → How should I serve these bites?
Serve chilled or at room temperature. Toothpicks make for easy pickup and they pair well with sparkling wine, lemonade, or iced tea for refreshing accompaniment.