 Save
Save My daughter pressed her nose against the bakery window one March afternoon, eyes locked on an Easter bunny cake that cost more than I wanted to spend. That night, I found myself at the kitchen table with flour dust already settling on my apron, determined to recreate that whimsical bunny shape from scratch. The idea of making something so cheerful and slightly ridiculous felt necessary somehow, like spring itself needed edible proof that winter had loosened its grip. This cake became our annual tradition not because it's difficult, but because it turns baking into an act of playful collaboration.
Years later, my son's kindergarten class did a spring party where I brought this bunny, and watching twenty small humans gasp when they realized the cake had a face made of candy made every minute of frosting worth it. One child asked if the bunny was asleep or just being silly, which pretty much captures everything I love about this recipe—it exists in that perfect space between celebration and nonsense.
Ingredients
- All-purpose flour (2 ½ cups): Standard baking flour holds everything together, but don't skip the sifting step for the cake layers—it aerates the flour so your crumb stays tender instead of dense.
- Baking powder (2 ½ tsp): This gives the cake its gentle rise without any egg-heavy taste, so every bite stays light.
- Salt (½ tsp): A tiny pinch that makes vanilla flavor pop like it's been turned up on a volume dial.
- Unsalted butter (1 cup for cake, 1 cup for frosting): Room temperature butter creams faster and creates the fluffiest base—cold butter will fight you the whole way.
- Granulated sugar (2 cups): This dissolves into the butter and creates that signature tender crumb texture rather than a grainy one.
- Eggs (4 large): Each one beaten in individually ensures they incorporate smoothly rather than creating a curdled mess.
- Pure vanilla extract (1 tbsp for cake, 1 ½ tsp for frosting): Real vanilla tastes like memory, and this cake deserves the genuine article.
- Whole milk (1 cup for cake, ¼ cup for frosting): The fat content keeps everything tender while the moisture prevents dryness.
- Powdered sugar (4 cups): Sift this before adding to frosting so you don't end up with mysterious lumps hiding throughout.
- Sweetened shredded coconut (2 cups): This isn't an accent—it's the whole personality of this frosting, so choose quality coconut that smells like the tropics.
- Pink food coloring: Just a few drops tint the ears and nose without making the frosting taste like chemicals.
- Jelly beans and candies: Check that any candy decorations are actually food-safe and not just beautiful plastic imitations.
- Licorice strings, mini marshmallows, and edible gel or chocolate chips: These become the bunny's face, so choose decorations that feel right to you.
Tired of Takeout? 🥡
Get 10 meals you can make faster than delivery arrives. Seriously.
One email. No spam. Unsubscribe anytime.
Instructions
- Prepare your stage:
- Preheat your oven to 350°F and grease those cake pans like you mean it—I use butter and flour because it genuinely works better than spray. Give yourself real counter space because assembly later will thank you for having room to breathe.
- Dry mixture foundation:
- Whisk flour, baking powder, and salt together in a medium bowl, making sure there are absolutely no lumps of baking powder hiding in corners. This step takes ninety seconds and prevents every dense-cake disaster.
- Butter and sugar magic:
- Beat softened butter and sugar together for a full three minutes—your arm will get tired and the mixture will transform from grainy to pale and fluffy. This isn't about speed; it's about incorporating air into the butter so the cake stays tender.
- Egg introduction:
- Add eggs one at a time, beating well after each addition so they emulsify into the butter rather than creating separated, curdled streaks. The batter should look glossy and well-combined before you add vanilla.
- Gentle alternation:
- This is where impatience ruins cakes—alternate adding flour and milk in thirds, starting and ending with flour, stirring just until combined each time. Overmixing at this point develops gluten and turns your cake tough instead of tender.
- Pan division:
- Split the batter evenly between your prepared pans and smooth the tops so they bake evenly. Uneven surfaces bake at different rates and create mountains instead of flat layers.
- The bake:
- Bake for 30-35 minutes until a toothpick inserted in the center comes out clean with just a few moist crumbs clinging to it. Thirty-five minutes is safer than thirty if you've never made this before.
- Cool with patience:
- Let cakes sit in pans for exactly ten minutes—this prevents them from breaking apart while still allowing them to release cleanly onto wire racks. Complete cooling takes at least an hour, and I usually make frosting during this time to multitask.
- Frosting creation:
- Beat softened butter until creamy, then gradually add sifted powdered sugar alternating with milk and vanilla until the frosting becomes fluffy and spreadable. If it's too thick, add milk by the teaspoon; too thin, add more powdered sugar slowly.
- Color division:
- Set aside half a cup of white frosting and tint it pink for the bunny's inner ears and nose. Food coloring is potent—use three drops, then add more if needed rather than overshooting and creating hot pink everywhere.
- The shaping moment:
- Cut one completely cooled round cake into two ear shapes and a small bow tie using a serrated knife and a template printed from online or sketched on paper. Take your time with this because straight cuts look intentional while ragged ones look accidental.
- Assembly on the board:
- Arrange your bunny face-forward on a large platter: one full round for the face, two ear shapes positioned above, and the bow tie below like a fancy collar. This arrangement makes the cake look intentional rather than random.
- Crumb coat foundation:
- Spread a thin layer of white frosting over the entire bunny to seal in crumbs, then chill for fifteen minutes while the frosting sets. This prevents visible cake bits from muddying your final frosting coat.
- Generous finish:
- Apply a generous frosting coat to all surfaces of the bunny, creating swoops and texture that look welcoming. An offset spatula makes this easier than a regular knife.
- Coconut application:
- Press shredded coconut onto every frosted surface while the frosting still feels slightly tacky, creating that fluffy bunny texture. Use your hands and don't be shy—this is what makes it look like a real bunny.
- Facial features:
- Use pink frosting to fill in the inner ears and nose, then arrange candies for eyes, chocolate for the nose, licorice for whiskers, and marshmallows for cheeks and tail. Step back between additions so you can see the bunny's personality emerging.
 Save
Save The real magic happens when someone who didn't help bake it walks into the kitchen and genuinely stops in their tracks, realizing that this came from your hands instead of a bakery box. That moment of recognition—that you created something both delicious and joyful—is why I make this cake.
Timing and Make-Ahead Strategy
I learned the hard way that this cake rewards planning over panic—bake the layers a full day ahead and wrap them tightly while they're completely cool, then store them at room temperature where they stay moist and tender. Frosting and assembly happen on the actual day, which means you spend maybe thirty minutes on the fun part instead of stressing about everything at once. The coconut coating also hides any frosting imperfections that develop over a few hours, so don't worry if your first attempt looks slightly messy.
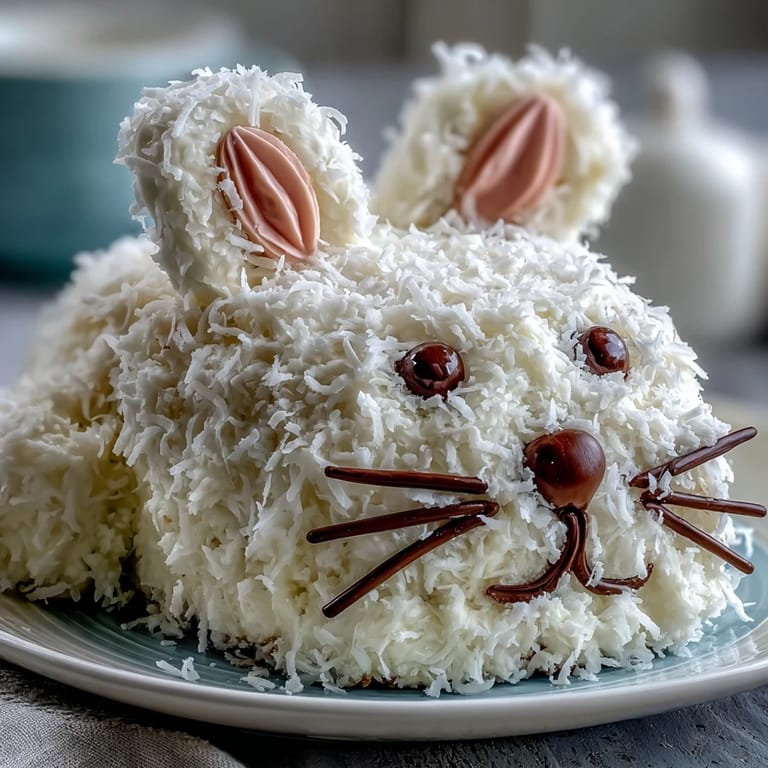
Understanding the Bunny Shape
The bunny starts as two simple round cake layers, and this is where the magic of perspective comes in—your brain sees the arrangement and instantly recognizes it as a face because you want to. Search online for an Easter bunny cake template to print or sketch one yourself, then use that as your cutting guide so the ears are actually ear-shaped instead of weird blobs. I always cut a little extra cake for snacking during assembly because pastry mistakes need to be immediately consumed.
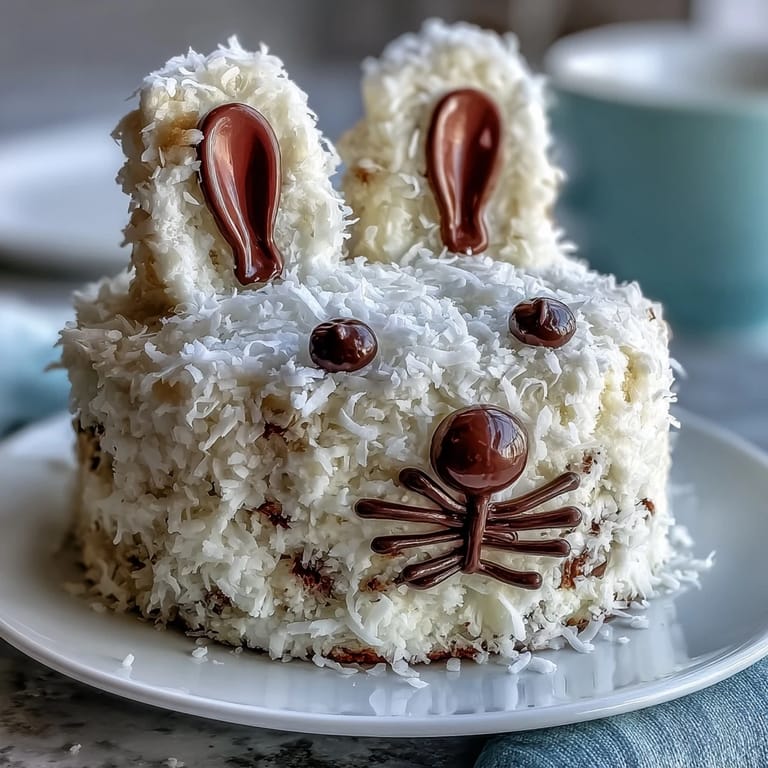
Frosting and Decoration Finesse
Coconut frosting behaves differently than standard buttercream because the shredded coconut adds texture and slightly increases the effort needed to spread it, but that effort pays off in personality that cream cheese frosting simply can't match. The pink tinting for ears and nose should feel subtle rather than garish, so add food coloring gradually and stop when it looks like bunny ears rather than an Easter explosion. One final truth: let people decorate the face themselves if they want to, because the bunny's personality becomes theirs that way.
- White coconut frosting photographs beautifully if you're documenting this moment, and the bunny looks cheerful rather than trying too hard.
- Candy choices matter emotionally—jelly beans feel springtime, chocolate eggs feel fancy, and gummy candies feel playful depending on your audience.
- This cake stays fresh and delicious for two days covered loosely with plastic wrap, so you can make it without last-minute pressure.
 Save
Save This bunny cake exists to prove that celebrations don't require professional baking skills, just willingness to make something joyful with your hands. Serve it with lemonade and pride.
Recipe Q&A Section
- → How do I shape the bunny ears and face?
After baking, one cake layer is trimmed to form ears and a bow tie, then arranged with a full round layer for the face. A serrated knife helps with precise cuts.
- → Can I use a different frosting than coconut?
Yes, cream cheese frosting can be substituted for a tangy contrast, or toasted coconut added to enrich the flavor.
- → What is the best way to get a fluffy frosting texture?
Beat the butter until creamy before gradually adding powdered sugar and milk, then whip until light and fluffy for an airy texture.
- → How long should the cake chill before decorating?
After applying a crumb coat, chill the cake for at least 15 minutes to set the base layer before adding final frosting and decorations.
- → Are there any allergen concerns with the decoration?
Yes, candy decorations may contain tree nuts. Always verify allergen info on the packaging before use.