Save
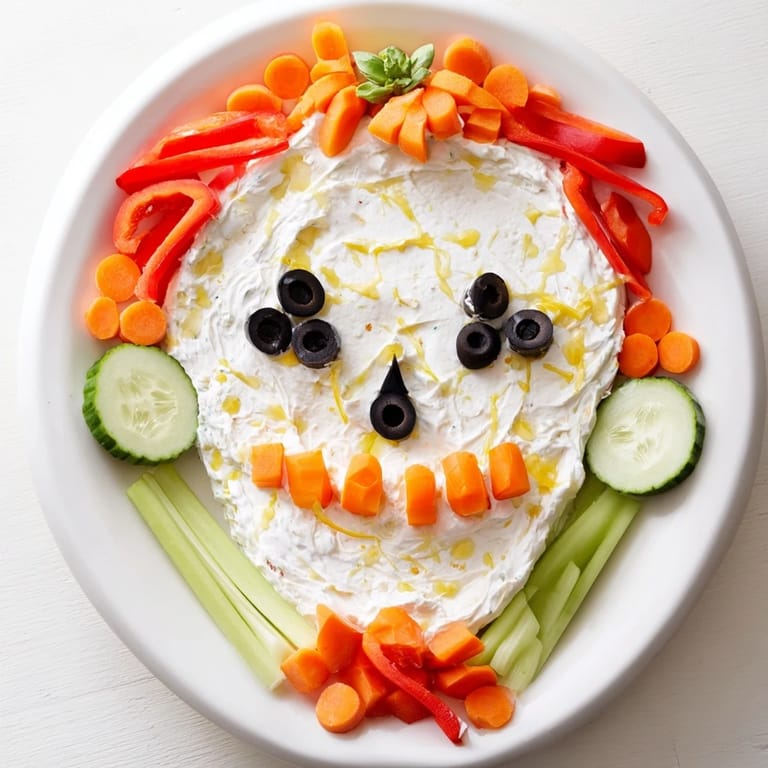
Save I'll never forget the year my nephew insisted on a Halloween party with a twist—no candy, only savory snacks. Panic set in until I remembered a trick from a food magazine: a skull made entirely from creamy spread and fresh vegetables. The moment I arranged those black olive eyes and carrot teeth on the platter, his entire face lit up. It wasn't just appetizers anymore; it was theater, edible art that made everyone gather around before they even realized they were eating vegetables.
The real magic happened when I made this for my daughter's school Halloween party. Two hours later, the platter came home completely empty—not a carrot round or olive left. But here's what got me: the other parents asked for the recipe. That's when I realized this isn't just food; it's a conversation starter, a memory maker, the thing people talk about long after the party ends.
Ingredients
- Cream cheese (8 oz), softened: This is your canvas. Softening it first makes spreading effortless—take it out of the fridge 15 minutes before you start. Cold cream cheese tears and frustrates; soft cream cheese transforms into smooth, sculptable art.
- Sour cream (2 tbsp): The secret weapon that loosens the spread just enough to become creamy without becoming runny. It also adds a subtle tang that keeps people reaching for more.
- Garlic powder and lemon juice (1 tsp each): These aren't afterthoughts—they wake up the spread's flavor so people forget they're eating cream cheese and just know it tastes good.
- Black olives (2 large): The eyes are everything. They're what make this a skull and not just a blob. Choose ones that are shiny and intact.
- Red bell pepper strips: The smile comes alive with color. These stay crisp and add a sweet crunch that balances the creamy base.
- Carrot rounds and pieces: Your teeth and nose. The orange is essential for contrast—it catches the eye immediately when someone looks at the platter.
- Celery sticks or breadsticks (2–4 long ones): The crossbones that anchor the whole design. Celery is your best friend here because it stays fresh and doesn't compete with flavors.
- Fresh parsley or chives (optional): A whisper of green that makes everything feel intentional and a little fancier than it is.
Tired of Takeout? 🥡
Get 10 meals you can make faster than delivery arrives. Seriously.
One email. No spam. Unsubscribe anytime.
Instructions
- Blend Your Base:
- In a bowl, combine the softened cream cheese, sour cream, garlic powder, lemon juice, salt, and pepper. Stir until it's completely smooth—no lumps, no streaks. This is the moment where you're building the foundation. Take your time. The spread should feel like cool, creamy butter that holds its shape.
- Shape the Skull:
- Pour your spread onto the center of a large platter and use a spatula to sculpt it into an oval skull shape. Think of it like you're forming a face—wider in the middle for the cheekbones, narrowing toward the top for the forehead, gently pointed at the chin. Smooth the surface with the back of your spatula. This is meditative; pretend you're creating something ancient and mysterious.
- Cross the Bones:
- Lay your celery sticks or breadsticks beneath the skull's bottom jaw, crossing them like an X. They should rest partially on the platter and partially on the spread's edge. This creates the classic skull and crossbones look that instantly reads as Halloween.
- Place the Eyes:
- Press those black olive halves into the upper part of the skull, spaced like a real skull's eye sockets. They'll sink slightly into the spread—that's perfect. They're the first thing people notice, so make sure they feel intentional and symmetrical.
- Add Nose and Mouth:
- Use a carrot slice or olive piece for the nose, positioning it between and slightly below the eyes. For the mouth, arrange red pepper strips and carrot rounds in a curve, like a grin or grimace. This is where personality comes in—make it look friendly or menacing, depending on your mood.
- Complete the Features:
- Fill in around the face with cucumber slices and extra vegetable pieces. Layer them slightly for depth and texture. There are no rules here—if it looks like part of a skull's features, it belongs. You're decorating a face, not following rigid geometry.
- Final Garnish and Chill:
- Sprinkle parsley or chives over the arrangement if you're using them. Cover loosely with plastic wrap and refrigerate until serving time. Chilling firms up the spread slightly, making the whole sculpture hold together beautifully on the platter.
 Save
Save There's a moment just before the party starts when the platter is finished, the skull stares up at you with those olive eyes, and you realize you've created something with your own hands that's going to make people smile before they even take a bite. That's when cooking stops being about ingredients and becomes about connection.
Timing and Presentation
Prep this up to 4 hours ahead if you want—it actually gets more beautiful as the spread firms up in the cold. About 30 minutes before guests arrive, pull it from the fridge so the spread softens slightly and becomes more spreadable for dipping. The vegetables stay crisp, the spread stays creamy, and everything is ready without you feeling rushed. Position the platter at eye level on a table—not hidden on a back counter. This deserves to be seen.
Making It Your Own
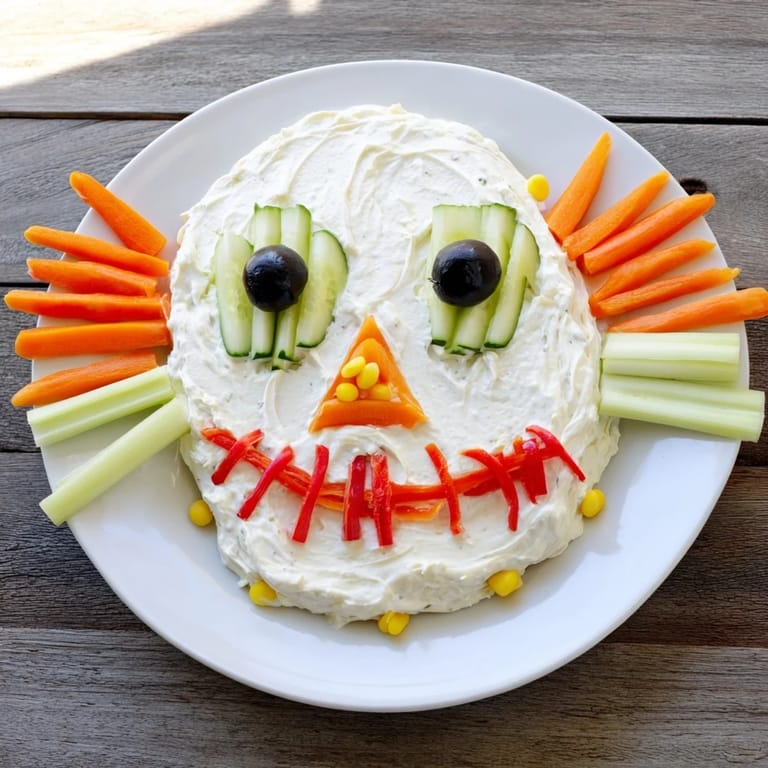
Once you understand the basic structure, this recipe becomes a playground. Add a handful of chopped chives or dill to the spread for herbaceous depth. Use roasted red peppers instead of fresh for a softer, sweeter flavor. Swap carrot for thinly sliced radishes for peppery crunch. Even switch the breadsticks for pretzel rods or long green beans. The skeleton stays the same, but the personality shifts with each choice. I've made this with everything from smoked paprika-infused spread to beet chips for deepened eye sockets—each version tells a different story.
Serving and Storage
Serve alongside crackers, pita chips, or extra sliced vegetables for dipping. The beauty of this recipe is that it's designed to be eaten—the vegetables pull off easily, the spread clings to them, and people naturally use them as edible utensils. Leftovers keep refrigerated for up to 2 days, though by then the vegetables soften and the sculpture loses its drama. The spread itself is delicious cold the next day as a dip on its own, so don't waste it. Life's too short for lonely leftover spreads.
- Arrange vegetables in small piles nearby so guests know what's meant to be eaten versus what's decoration
- Make the eyes slightly oversized—they're the anchor point that makes everything read as a skull instantly
- If serving at a warm venue, keep the platter on ice underneath to maintain the spread's firmness
 Save
Save Halloween comes once a year, but the memory of a platter that made everyone smile? That lasts. Make this, watch people light up, and know that sometimes the best recipes aren't the most complicated—they're the ones made with intention and a little bit of playfulness.
Recipe Q&A Section
- → How long does the preparation take?
Preparation time is approximately 20 minutes, with no cooking required.
- → Can I make a gluten-free version?
Yes, use only celery sticks or gluten-free breadsticks as crossbones to keep it gluten-free.
- → What ingredients create the skull features?
Sliced cucumbers, red bell peppers, black olives, and carrot rounds form the eyes, nose, teeth, and mouth.
- → Is this spread suitable for vegetarians?
Yes, it is vegetarian friendly and can be enjoyed by those avoiding meat.
- → How should I serve the spread?
Serve chilled on a large platter with assorted crackers, pita chips, or vegetable dippers.
- → Can I add extra flavor to the creamy base?
Adding chopped chives or herbs to the cream cheese mix intensifies the flavor nicely.