 Save
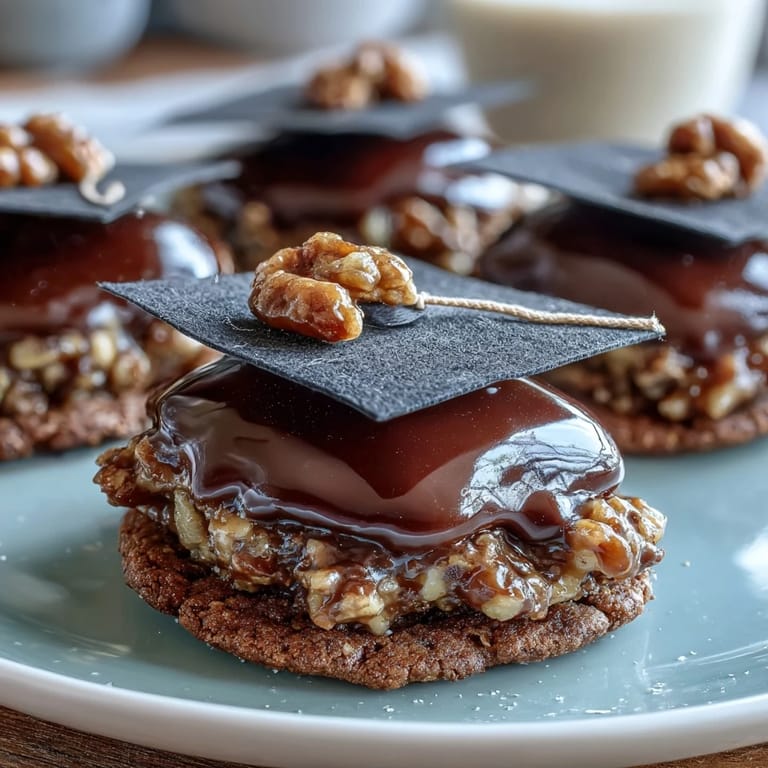
Save My neighbor's daughter was graduating, and I wanted to create something memorable for her celebration party. While scrolling through decoration ideas at midnight, I landed on the concept of graduation cap cookies and instantly knew these would be perfect. There's something magical about turning a simple sugar cookie into a tiny edible diploma, complete with that signature black cap and golden tassel. The joy on her face when she bit into one made all the piping and careful icing work absolutely worth it.
I'll never forget standing in my kitchen at 2 AM, piping tiny yellow tassels onto forty cookies while my husband periodically checked on me with bemused concern. By the time I placed that last M&M on the last tassel, I was giddy with the kind of tired-happy that only comes from creating something beautiful for someone you care about. When the graduate walked into the party and saw the table full of these little caps, she literally gasped, and that moment made every careful brushstroke completely meaningful.
Ingredients
- All-purpose flour (2 1/2 cups): This is your foundation, and weighing it out makes a real difference in consistency from batch to batch, so grab that kitchen scale if you have one.
- Unsalted butter (3/4 cup), softened: Softened butter creams beautifully with sugar and creates that tender crumb; pulling it out thirty minutes before you start is the secret move.
- Granulated sugar (1 cup): This sweetens the cookie and helps them spread just enough to get those crisp edges without becoming greasy.
- Egg and vanilla extract: The egg brings structure while vanilla deepens the flavor in a way that makes people ask what your secret ingredient is.
- Baking powder and salt: Just small amounts, but they lift the cookies slightly and balance the sweetness perfectly.
- Powdered sugar (3 cups), sifted: Sifting removes lumps that would otherwise ruin your smooth royal icing, so don't skip this step even though it feels tedious.
- Egg whites or meringue powder: Real egg whites create glossy icing that hardens beautifully; if you're concerned about raw eggs, meringue powder mixed with water is a safe substitute.
- Black and yellow gel food coloring: Gel colorings are more concentrated than liquids, so they won't thin out your icing the way liquid food dye would.
- Mini M&Ms or candy pearls: These tiny tassels are what transform plain decorated cookies into graduation caps, and honestly, they're fun to place one by one.
Tired of Takeout? 🥡
Get 10 meals you can make faster than delivery arrives. Seriously.
One email. No spam. Unsubscribe anytime.
Instructions
- Mix the dry ingredients:
- Whisk together your flour, baking powder, and salt in a bowl so everything is evenly distributed before you add it to the wet ingredients. This prevents lumps and ensures every cookie has the same tender texture.
- Cream butter and sugar:
- Beat them together for about two to three minutes until the mixture is pale and fluffy, which means air bubbles are being incorporated for lift. You'll notice the mixture transforms from looking dense to almost cloud-like, and that's exactly what you want.
- Incorporate egg and vanilla:
- Add these to your creamed butter and sugar, mixing until you can't see any streaks of egg white anymore. This step brings everything together into a cohesive base.
- Bring dough together:
- Gradually add your flour mixture, stirring just until the dough comes together, being careful not to overmix which would make the cookies tough. You're aiming for a soft, pliable dough that holds together without being sticky.
- Chill the dough:
- Divide it in half, shape each portion into a disk, wrap tightly in plastic, and refrigerate for thirty minutes so it becomes easier to roll and cut without sticking. This waiting period is crucial and actually gives you a built-in break point if you're planning to bake later.
- Roll and cut:
- On a lightly floured surface, roll the dough to about a quarter-inch thickness, then use your graduation cap or square cutter to create shapes. The thinner you roll them, the crispier they'll be, though be careful not to go so thin they become fragile.
- Bake until golden:
- Spread cookies on parchment-lined sheets and bake at 350 degrees for eight to ten minutes, watching for just a hint of golden color at the edges. They'll continue cooking slightly on the hot pan after you remove them, so don't overbake or they'll become too hard.
- Beat egg whites for icing:
- Whether using fresh egg whites or reconstituted meringue powder, beat until foamy, then gradually add sifted powdered sugar while continuing to beat for about five minutes. You're looking for stiff, glossy peaks that hold their shape when you lift the beaters.
- Color your icing:
- Reserve a small portion for yellow icing, then tint the rest black with gel food coloring, adding just a tiny drop at a time since these colorants are potent. Mix thoroughly to avoid streaky colors.
- Outline and flood:
- Using a piping bag with a thin tip, outline each cookie with black icing, then fill in the middle by piping more icing and spreading it to the edges with a toothpick. Let this set for thirty to sixty minutes until it hardens enough that you can add the yellow details without them bleeding together.
- Pipe the tassel and button:
- Fill a piping bag with yellow icing and pipe a small decorative tassel and button on top of each black cap. These details are what make it unmistakably a graduation cap.
- Add the final touch:
- Press a mini M&M or candy pearl onto the end of each yellow tassel, securing it in the soft icing. Let everything dry completely, preferably overnight, before serving or packing them up as gifts.
 Save
Save There's a quiet satisfaction in watching someone bite into a cookie they thought was just decoration and discovering it's actually delicious. My favorite moment that evening wasn't just the initial reaction, but seeing people pick up a second and third cookie because they couldn't resist the combination of that buttery base and the sweet crunch of the icing.
Timing Your Baking and Decorating
I learned through happy accident that baking the cookies one day and decorating them the next actually works better than trying to do everything at once. The cookies stay fresher longer, your hands aren't cramping from piping by midnight, and you get to approach the decorating with a clear head instead of standing in a flour cloud. Plus, if something goes slightly wrong with the icing, you have time to remake it without panicking about cookies drying out.
Storage and Gifting Magic
Once fully hardened, these cookies are surprisingly sturdy for shipping or stacking in containers, which makes them perfect for giving as gifts or bringing to celebrations. I've successfully packed them in layers separated by parchment paper and had them arrive across state lines without a single cap losing its tassel. The royal icing acts like an edible seal that protects them, and honestly, part of their charm is that they look almost too nice to eat until someone takes that first brave bite.
Playing with Variations and Personal Touches
Once you master the basic technique, these cookies become a canvas for customization that makes them feel even more special. I've added the graduate's school colors into the icing, piped tiny initials on the caps, and even mixed edible gold dust into the yellow icing for extra sparkle. The beauty of this recipe is that it's simple enough to execute reliably, but forgiving enough that you can get creative without worrying about ruining the whole batch.
- Try piping the graduate's initials or graduation year onto each cap in a contrasting icing color for a personalized touch.
- Mix edible glitter or pearl dust into your royal icing for a shimmery, celebratory finish that catches the light beautifully.
- If you're short on time, store-bought royal icing works perfectly and lets you skip the beating step entirely while still achieving a professional-looking result.
 Save
Save These cookies transformed a graduation party into something genuinely memorable, and now whenever I see someone wear a graduation cap, I think about those little edible ones with their perfect black icing and golden tassels. Making these for someone you care about celebrates not just their achievement, but the care you put into creating something beautiful and delicious for their special moment.
Recipe Q&A Section
- → What gives the cookies a crisp texture?
The combination of all-purpose flour and proper chilling of the dough before baking helps achieve a crisp edge and tender crumb.
- → How is the royal icing made smooth and glossy?
Beating egg whites or meringue powder with powdered sugar until stiff peaks form creates a smooth, glossy texture perfect for decorating.
- → Can I use natural colors for the icing?
Yes, natural food colorings can replace gel colors without compromising the icing’s consistency and appearance.
- → What is the purpose of chilling the dough?
Chilling the dough firms it up, preventing excessive spreading during baking and helping maintain the shape of the caps.
- → How long should the decorated cookies dry?
Allow at least 30–60 minutes for the icing to set initially, but ideally dry for several hours or overnight for best firmness.
- → Are there any common allergens in these cookies?
Yes, the cookies contain wheat, eggs, and dairy from butter; check candy toppings for additional allergens.